Saturday, July 30, 2011

Happy National Cheesecake Day!!


In honor of National Cheesecake Day I am posting the recipe for my favorite cheesecake!!

This is an old family recipe passed down from my maternal grandmother.  It has been made by my mom for many, many years and now, of course I make it too! 

Anyone who has ever tried this cheesecake falls in love with it.  And for good reason!  It is not like your average thick, dense cheesecakes.  It's got a very smooth, creamy texture as opposed to the grainy one I've noticed in some recipes.  This recipe really couldn't be easier to make, but I feel compelled to warn you that you'll need to beat the mixture for 15 minutes.  I know.  Pick your jaw up off the floor.  It is a long time, but it really is what gives this cheesecake it's velvety smooth texture.  And if you have one of these babies it's a cinch! 
My hubby surprised me with this last Christmas.  Isn't she pretty??  It's definitely one of the best gifts I've ever received and honestly don't know how I lived for so long without it!

Similar to my opposition to cottage cheese in lasagna, I am strongly against sour cream in cheesecake.  I just do not enjoy the flavor sour cream gives to cheesecake.  In fact, as soon as I see sour cream listed in the ingredients for a cheesecake recipe I turn the page.  I have nothing against sour cream, I just don't like it in cheesecake!  So needless to say, there is no sour cream in MY cheesecake!

My daughter actually loves this cheesecake and every year asks for it to be her birthday cake! 

The Stars of the Show: 

Cream cheese.  Surprised??  I didn't think so.

A graham cracker crust.  Back in the day my grandma and mom would make the crust from scratch.  Because I really don't think it makes that much of a difference in the end result, I take the help from the little elves and use a pre-made crust.

Cherry pie filling.  I have a secret.  I don't like cherries.  I don't like cherry pie filling either.  But I DO like cherry flavored things.  And I can't make this cheesecake without the cherry filling on top.  I usually just scrape off the cherries, leaving behind the yummy cherry flavored syrup.

You also need sugar, eggs and vanilla.

You definitely need to celebrate this special day with this amazing recipe!  You won't regret it!

Cheesecake
 Source: Family recipe

2 eggs
2 8-oz. packages cream cheese, softened to room temperature
3/4 cup sugar
1 tsp vanilla
10" graham cracker crust
1 can cherry pie filling (or blueberry)
Preheat oven to 350 degrees.  Put first four ingredients (except pie crust) into bowl of mixer or large bowl.  Beat on low speed for 15 minutes, scraping down the bowl occasionally.  Pour into crust.  Bake 25 minutes until the top just barely begins to brown. 

Cool completely.  Top with fruit topping.  Refrigerate overnight.

Friday, July 29, 2011

Baked Garlic Parmesan Chicken

By now you have probably figured out that I cook chicken a lot.  And I do.  Well, I try to cook at least one chicken dish a week. 
 Chicken is just so easy and so versatile!  I love that you can make it so many ways.    Plus, it's pretty inexpensive.
 
I usually buy the big bags of frozen, boneless, skinless chicken breasts.  I love these because they allow me to pretty much always have chicken on hand but since it's frozen I don't have to worry about it going bad if my week gets crazy and I don't get it cooked as I had planned.  (Yes, this happens.  A lot.)

This chicken recipe is really tasty and another one that my whole family loves!  Dipping the chicken in the olive oil/garlic mixture really gives it a lot more flavor than just dipping it in egg.  It's super easy and fast to make too.  I serve it with either rice, potatoes or noodles and some sort of vegetable. 

  Please excuse my lack of photos in this post.  I haven't made this recently enough to have pics, but wanted to share it with you!
Baked Garlic Parmesan Chicken
via allrecipes
2 tbs. olive oil
1 clove garlic, minced
1 cup dry bread crumbs
2/3 cup Parmesan cheese
1 tsp. dried basil
1/4 tsp. black pepper
6 boneless, skinless chicken breast halves
Preheat oven to 350.  Lightly grease a 9 x 13 inch baking pan.  

In a bowl, blend the olive oil and garlic.  In a separate bowl, mix the bread crumbs, Parmesan cheese, basil, and pepper.  Dip each chicken breast in the oil mixture, then in the bread crumb mixture.  Arrange the coated chicken breasts in the prepared baking dish and top with any remaining crumb mixture.

Bake 20-25 minutes in the preheated oven, or until chicken is no longer pink and juices run clear.

Thursday, July 28, 2011

Homemade Italian Meatballs


I commonly buy frozen, precooked meatballs, but every once in a while I like to go all out and make some good ol' Italian Meatballs from scratch.  My hubby loves meatballs and while he'll eat the frozen ones, he gets really excited when homemade ones make an appearance!


Just like with so many other things, there are probably 100 (or more) different ways to make meatballs.  This is MY favorite recipe.  

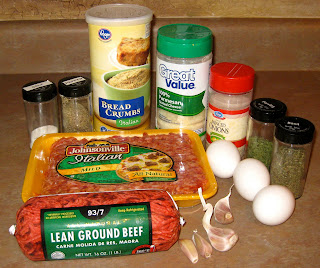
The Stars of the Show: ground beef, Italian sausage (I use mild), eggs, bread crumbs, Parmesan cheese, minced onions, parsley, basil, garlic, salt and pepper.

Mix up the meatball mixture and scoop onto a baking pan.  I like to use my broiler pan for this because the grease drips down to the bottom of the pan (which I line with foil).  See this post for my thoughts on meat cooking in its own grease :-).  I use my large cookie scoop to scoop my meatballs so they are all the same size.  All the same size means they not only look great, but they all cook at the same rate.

Once I scoop them all onto the pan I use my hands to roll them into nice round balls.

Throw them into the oven and bake!  

Now you have some options here.  If I am going to be using these meatballs right away I only bake them for about 15 minutes and then finish cooking them in the sauce.  If I'm going to freeze them for later I cook them for about 25 minutes (or until they are cooked all the way through).

This recipe makes a lot of meatballs which makes for a great freezer meal later on!  I just take half the meatballs (fully cooked) and put them in a ziplock bag.  Label and toss into the freezer.  When you are ready to use them just thaw them in the fridge or you can even cook them frozen in a crockpot with your favorite pasta sauce.

Homemade Italian Meatballs
Source: My recipe

½ cup breadcrumbs
3 eggs
½ cup Parmesan cheese
3-4 garlic cloves
1 ½ tsp. basil
1 ½ tsp. parsley
3 tbs dried minced onion
1 tsp. salt
½ tsp. pepper
1 lb. ground beef
1 lb. Italian sausage

In a large bowl, mix together the first nine ingredients until well combined.  Add the ground beef and sausage and mix gently just until everything is well mixed.  

Scoop meatballs onto a baking pan and bake at 350 degrees for 20-25 minutes.


Wednesday, July 27, 2011

Buffalo Pretzels


 I found the recipe for these yummy pretzels over at Tasty Kitchen.   

I was hosting the July meeting of Crochet Club and thought I'd give them a try!

First off, I have to say that I'm not sure I could have dirtied more dishes making these pretzels!  I am so glad that you all can benefit from the mistakes that I made. 

Ok, so here are my thoughts on this recipe.  #1.  This makes A LOT of pretzels!!  Once I had mixed it all up I realized that I probably should have halved the recipe.  So if you don't want massive amounts of buffalo pretzels you might want to cut it in half or find someone to pawn them off on ;-).  

#2.  These pretzels were good but I really couldn't taste a lot of "buffalo" flavor, which was disappointing.  They definitely taste like ranch though.  Next time I make them I think I will increase the buffalo sauce. 

The Stars of the Show:

Pretzels, Ranch mix, butter, celery salt and buffalo wing sauce.


 This is the first vessel I attempted to use for the pretzels.  Too small.
 Finally I figured out that this 13 x 9 pan was best.  You mix the Ranch, celery salt and buffalo sauce in the melted butter.  Then you pour it over the pretzels and mix mix mix it up.  I'm glad I used this pan and not a bowl because it helped me to be able to get all the pretzels coated. 


 Awww....look who stopped by to steal!


 Once the pretzels are coated you need to put them onto a cookie sheet (or two).  Here is where I ran into another snafoo.  First I tried putting them onto a cookie sheet that had no sides, but the pretzels kept falling off the cookie sheet so I ended up piling them onto smaller cookie sheets with sides.

 Once the pretzels are in the oven you have to stir them every 15 minutes.  Another tip I learned: take the cookie sheets out of the oven while you stir otherwise you will have buffalo pretzels all over the bottom of the oven!

 Buffalo Pretzels
Via Tasty Kitchen

 12 cups Assorted Pretzles 
5 ounces, weight Butter, Melted (1 stick + 1 tbs.)
1 package (about 1 Oz. Packet) Hidden Valley Ranch Dressing Mix 
½ teaspoons Celery Salt 
2 Tablespoons Buffalo Wing Sauce

 Preheat oven to 250ºF and cover a large baking sheet with parchment paper. Pour pretzels in a large bowl and set aside. In a small bowl, melt the butter. Add ranch mix, celery salt and wing sauce. Stir. Pour over pretzels and stir to coat.  Once everything is coated with the melted sauce mixture, pour over the prepared baking sheet and spread out. Bake for 1 hour, stirring every 15 minutes. Cool. 


Tuesday, July 26, 2011

Sweet and Sour Meatballs


I remember as a kid, sweet and sour meatballs being one of my favorite dinners!  My mom made them with grape jelly and bbq sauce.  There are so many different ways to make them, but this is my favorite!

The Stars of the Show:


A bottle of chili sauce and a can of jellied cranberry sauce.


And a package of frozen meatballs.  

Of course you can make your own meatballs, but for this recipe I take the help from the store and buy them pre-made.  

Note: you do not want to use Italian meatballs for this.  While they are delicious, they have seasonings in them that will not go well with the sweet and sour sauce.  I use either Swedish or Homestyle meatballs.


You can serve these meatballs as appetizers or a meal with rice, noodles or mashed potatoes.


Sweet and Sour Meatballs

1 jar chili sauce
1 can jellied cranberry sauce
1 pkg. frozen meatballs (Swedish or Homestyle)

Mix the chili sauce and cranberry sauce to combine.  Put meatballs in a crockpot.  Pour the sauce over the meatballs and cook on low for 4-6 hours.

Note:  You do not need to thaw the meatballs before adding them to the crock pot.

Printable Recipe

Monday, July 25, 2011

Fluffernutter Cookies

Who doesn't love a good old fluffernutter?  Ok, I know some of you are wondering what the heck a fluffernutter is so I'll tell you.  It is a sandwich with peanut butter and marshmallow cream.  These cookies are just like a fluffernutter sandwich with a little bit of s'more (the chocolate) thrown into the mix. 

The inspiration for these cookies came from here but I ended up making my own heavily modified version to make them a little quicker and easier.  Cause I like quicker.  And easier.  

The original recipe calls for making peanut butter cookie dough from scratch.  I happen to think Betty Crocker makes a pretty good pb cookie mix so I used that instead.  I also streamlined the recipe by adding a square of Hershey's chocolate, (I have plenty thanks to my s'more addiction) to the top instead of making the chocolate glaze in the original recipe. 

These cookies are so insanely good.  I won't even tell you how many I ate because well, it's sort of embarrassing.  But if you know what's good for you, you really need to make these cookies asap!


The Stars of the Show: Peanut cookie mix, plus the egg, oil and water listed on the package, mini marshmallows, and about 1 1/2 Hershey's bars.

Make cookie dough according to package directions.

Scoop the cookies onto a baking sheet.  And bake for about 8 minutes.  You want them to be slightly under-baked because they will be going back in the oven.


Once the initial baking is done, take them out of the oven and put three mini marshmallows on the top of each cookie.  You will need to press them down a little.  Then put them back in the oven for 2 minutes until the marshmallows are slightly puffed.
It's hard to see the difference, but this is what they will look like after the marshmallows are puffed and hot.  Now you will put a square of chocolate on the top of each one.  If you have any stinks around they are good for breaking the candy bar into squares for you! 

Stick them back in the oven for 30 seconds.  Doesn't seem very long but trust me, you just want the chocolate to start to melt you do not want it to start oozing all over the place.

Leave the cookies on the cookie sheet for about 3 minutes then put on a wire rack to cool completely.  

Then take a bite and savor the melty chocolate, the sticky marshmallow and the soft peanut buttery cookie!
Then shamelessly eat five or six.

Fluffernutter Cookies
Inspired by Bakergirl

1 pkg. peanut butter cookie mix, plus ingredients on package
Mini Marshmallows
About 1 1/2 Hershey's Chocolate Bars, broken into squares

Prepare cookie mix according to package directions.  Bake at 350 degrees for 8 minutes.  Remove from oven and immediately put three mini marshmallows on top of each cookie, pressing lightly.  Place back in oven for 2 minutes.  Remove from oven and top marshmallows with a chocolate square.  Put back in oven for 30 seconds more.  Remove from oven and cool cookies on cookie sheet for 3 minutes before removing to a wire rack to cool completely. 

Yield: about 2 dozen

Meal Plan Monday ~ Week of July 24, 2011


 Since I began living on my own at age 18,  meal planning is pretty much something I have always done.  I'm not even quite sure how I started I just know I always did it.  Could be because I am a planner at heart and tend to be super organized.

I've never been one to just go to the grocery store, put some things in the cart and go home and throw together a meal or two.  I also do not like to make extra trips to the grocery store, nor do I have the time!  So for me, meal planning is a necessity.

 For this week's Meal Plan Monday I thought I'd share MY method for meal planning.  Feel free to use any of these ideas as is or modify them to fit your needs.

 I usually grocery shop on Sunday morning.  Don't ask me why.  I just always have and well, I'm a creature of habit (and just a bit OCD).  So pretty much every Sunday morning looks like this:

Step 1: Scour my sources for inspiration.  Sometimes I already have meal ideas in mind so I'll write those down first.  Then I look through my many recipe sources to fill in the rest.  I use cookbooks, my recipe binder,  and of course the items I have pinned online.  I generally only cook Sunday-Thursday.  I give myself Friday and Saturday off :-). 


 Once I know what I'm making I write it down on my handy dandy dry erase Meal Planning Calendar.  I got this really cute one from Target.  It came with a pad for making my shopping lists.  It is magnetic so it lives on the side of the refrigerator.  One great thing about this is you don't have to hear "Mom, what's for dinner?" a hundred times because everyone can just go and look at the calendar.

In case you can't tell, the first column is for lunch.  It's blank right now but we use it during the school year and it helps keep track of which days the kids plan to eat the cafeteria lunch and which days they need to bring their lunch.

The middle column is for dinners and the right side is for "Notes".  I usually write the recipe source in this column so I know exactly where to go for the recipe I may need.

You can plan for as many days ahead as you would like (although I suggest at least a week).  I know some people plan their meals for an entire month at a time.   I only plan a week at a time because I base my meals on the store's sales and also, many times I see a recipe that is a "must try" and I don't want to wait a whole month to put it into my schedule.

 Step 2:  Make a list.  Or two.  A word of caution here.  I am slightly anal so I usually make two lists as you will see here.  Of course one list will suffice.

 First, I go through my list of meals and, considering which ingredients I have on hand already, I make a list of the things I need to buy.  Pretty simple.


The next step in my list process is to go through it and re-write it trying to organize it based on the set-up of my grocery store.  For example, I list all of my produce items together at the top of the list because this is the section I start in.  I know this seems a little.....well....crazy.  But it keeps me from forgetting things and from wasting time going back and forth in the store for things on my list I forgot.  It works for me.

Normally my list is a lot longer, but since I'm going out of town on Wednesday I only had three dinners to plan.  I also never write down the things (milk, cereal, etc.) that I buy every single week.

Step 3:  Grab The Stinks and go shopping!  Yes, I take my kids with me to the store.  It is a lot easier without them but I usually don't mind taking them.  I think it offers a great learning experience for them (there's the teacher in me coming out) plus it helps us to practice "not having to get something every time we go to the store".  :-). 

Soooo....if you're still with me here is this week's meal plan.

Sunday- Spaghetti and meatballs, garlic bread
Monday- Family Favorite Chili Mac, garlic cheese biscuits
Tuesday- BBQ Chicken, KFC Coleslaw, corn on the cob

Weekly Treat- Fluffernutter Cookies

As usual, anything in red is a recipe I will be posting in the near future!

For more meal plan ideas you can check here.  Have a great week!

Sunday, July 24, 2011

Chocolate Eclair Cake


I've had this recipe for a long long time.  It is really easy and super yummy!  My kind of dessert!


The Stars of the Show:  Milk, graham crackers, cool whip, vanilla pudding and chocolate frosting.


All you do is mix up the pudding, milk and cool whip, get your graham crackers and get your layer on! 


Once it's all layered, put the frosting on and spread it around.  And that's it!  Oh, well it needs to be refrigerated for a while before you can eat it to soften the graham crackers.  That is the only bummer part of this recipe!

Chocolate Eclair Cake
via allrecipes.com

1 box graham crackers
2 small pkgs. vanilla instant pudding
3 cups milk
1 can chocolate frosting
1 8 oz. cool whip

Make pudding with only 3 cups of milk. Fold into Cool Whip. Layer bottom of 9 x 13 pans with  graham crackers. Top with 1/2 pudding mixture. Another layer of crackers, another layer of pudding mixture. Finally, top with another layer of crackers. Microwave frosting and pour evenly over pan for that smooth look. Best if made the night before so the crackers get soft.

Printable Recipe

Saturday, July 23, 2011

Orzo with Parmesan and Basil


I have had the recipe for this side dish for quite some time and for some reason haven't made it...until now.  See, that's what I love about this blog.  It's forcing....no, more like encouraging me to try new recipes.  And believe me, I have tons of them!

The recipe for this side dish came from allrecipes.com and all I have to say is WOW!!!  It was really, really good!  Delicious!  Easy and so tasty!  Now who doesn't love that kind of recipe?  I will definitely make this one over and over again!  YUM!  

Ok, now onto the recipe.

The Stars of the Show: Orzo, butter, chicken broth, parmesan cheese, dried basil.  The original recipe calls for fresh basil.  I didn't have any so I used dried and it was still delicious!

Orzo is a rice shaped pasta (in case you've never cooked with it before).  It can be found right next to all the other dried pasta in any grocery store.  Above is my cute little Peanut modeling it for you!

The first step is to brown the orzo in some melted butter.  Just melt some butter and pour in the dry pasta.  You don't have to stir it constantly but you do want to give it a stir every few minutes to make sure it doesn't burn.  Browning the orzo first gives it a real yummy flavor.


This is what it will look like when it is browned.  Once it's browned you are going to pour in your can of chicken broth and bring it to a boil.  Once it's boiling be sure to turn down the heat to med-low, cover the pan and leave it alone for about 15-20 minutes.  I did give mine a little stir about halfway through just to make sure it was doing ok and not sticking to the bottom.

Here is what it looks like when it's done.  You want most of the liquid to be absorbed, but you don't want it to be dried out.  At this point, you turn off the heat and add the parmesan and basil and stir it to combine.  Then try not to burn your mouth as you dig into it!

So delicious!  Please don't let my bad photography keep you from trying this recipe :-).

Orzo with Parmesan and Basil
via allrecipes.com

2 tbs. butter
1 cup uncooked orzo pasta
1 (12.5 oz.) can chicken broth
1/2 cup Parmesan cheese
1/2 tsp dried basil (or 1/4 cup chopped fresh)
salt and pepper to taste

Melt butter in heavy skillet over med-high heat.  Stir in orzo and saute until lightly browned.  
 Stir in chicken stock and bring to a boil.  Cover.  Reduce heat and simmer until orzo is tender and liquid is absorbed, about 15-20 minutes.
Mix in Parmesan cheese and basil.  Season with salt and pepper.  Transfer to a shallow bowl.  Garnish with basil sprigs if desired.

Thursday, July 21, 2011

Ultimate Chicken Fingers


Today's recipe comes from another one of my most favorite summer finds,  Plain Chicken.  

I have to admit that when I decided to try this recipe I really didn't have high hopes.  I have tried quite a few similar recipes and haven't been too impressed.

However, I have to say that I was pleasantly surprised!  This recipe is fantastic!!!  It was very easy, uses simple ingredients and has SO much flavor!  You must make them! 


The Stars of the Show:  Boneless, skinless chicken breasts, cut into strips (you can also buy chicken tenders which will save you from having to cut them into strips, or you can cut the chicken into nuggets.  Whatever floats your boat), Bisquick, parmesan cheese, an egg, garlic salt, pepper and paprika.


 Combine the Bisquick, parmesan, garlic salt and paprika on a plate or other vessel of your choice.


 Sprinkle the chicken with some garlic salt and pepper.


Next you will dip your chicken strips into the egg (which you beat), and dredge it in the Bisquick mixture.  Then you park the strips onto a foil lined baking sheet that you have sprayed with cooking spray.   

I sprayed my foil and some of the chicken still stuck a little to the bottom.  Not sure why but I think next time I will either use non-stick foil or just ditch the foil altogether and cook them right on my non-stick cookie sheet.  

Cook the chicken at 450 for about 12-15 minutes.  They don't take long since they're small and if you over cook them you'll have a hard time swallowing them because they will be so dried out.


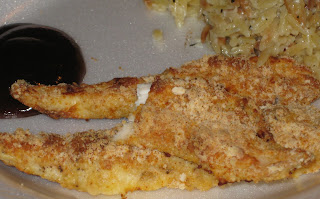
And here they are!  

Please excuse all the paper plates in this post.  I really hate to wash dishes if I don't have to.


  These chicken strips were a big hit with everyone in my family with the exception of course, of Muffin, the worlds pickiest eater!  He wouldn't even try them.


 This was Muffin's dinner.
He's so excited for his cheerios.  Can you tell?  


Ultimate Chicken Fingers
via Plain Chicken

3 boneless skinless chicken breast, cut into strips (or chicken tenders)
2/3 cup Bisquick
1/2 cup grated Parmesan cheese
1 tsp garlic salt
1/2 tsp paprika
1 egg, slightly beaten
pepper
garlic salt
cooking spray

Heat oven to 450.  Line cookie sheet with foil; spray with cooking spray.  Combine Bisquick, cheese, garlic salt and paprika, set aside.  Season chicken strips with a little garlic salt and pepper.  Dip chicken stips into egg; then coat in Bisquick mixture.    Place on cookie sheet and spray with cooking spray.  Bake 12-14 minutes.