Friday, December 30, 2011

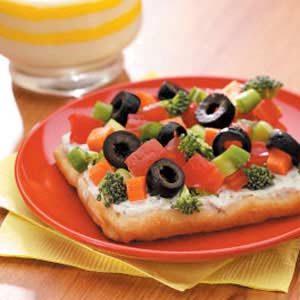
Cool Veggie Pizza

This is a very easy and delicious appetizer.  You can vary the veggies to your liking. 

Cool Veggie Pizza

2 cans (8 oz each) Pillsbury refrigerated crescent dinner rolls or 2 cans (8 oz each) Pillsbury Place 'n Bake refrigerated crescent rounds or Pillsbury Crescent Recipe Creations refrigerated seamless dough sheet
 
1 package (8 oz) cream cheese, softened
 
1/2 cup sour cream
 
1 teaspoon dried dill weed
 
1/8 teaspoon garlic powder
 
1/2 cup small fresh broccoli florets
 
1/3 cup quartered cucumber slices
 
1 red pepper, seeded, chopped
 
1/4 cup sliced carrot

1 small can sliced black olives

Heat oven to 375°F. 2 If using crescent rolls: Unroll both cans of dough; separate dough into 4 long rectangles. In ungreased 15x10x1-inch pan, place dough; press in bottom and up sides to form crust. If using dough sheets: Unroll both cans of dough. In ungreased 15x10x1-inch pan, place dough; press in bottom and up sides to form crust.  

Bake 13 to 17 minutes or until golden brown. Cool completely, about 30 minutes.
 
In small bowl, mix cream cheese, sour cream, dill and garlic powder until smooth. Spread over crust. Top with vegetables. Serve immediately, or cover and refrigerate 1 to 2 hours before serving.  Cut into 8 rows by 4 rows.
Monday, December 26, 2011

Meal Plan Monday ~ Week of Dec. 26


So...did everyone survive Christmas?  We had a wonderful couple of days of food, family, fun and presents!  It was a great way to start off a two week vacation!  Now that the holidays are over, completing the items on my Winter Break Bucket List is in full swing.

One of the (many) best things about being on vacation is being able to cook meals stress (and exhaustion) free.  I really try to take advantage of this by making recipes that may be a little more time consuming or labor intensive than I would during an average week.

This week I'll be making some Pinterest inspired dishes and next week I plan to cook from some of my many "to be read" cookbooks.  Sometime next week I also plan on having a big cooking day to stock my freezer before heading back to work on the 9th.

So...here is my meal plan for this week.

Monday- Roasted sausage, potatoes and peppers and homemade bread

Tuesday- I'm meeting a friend for dinner so the kids and hubs are on their own.

Wednesday- Crock pot bbq chicken, corn and garlic cheddar biscuits

Thursday- Chicken Scampi

Friday- Not sure yet.

I'll be making some crock pot chocolate cobbler this week also!  Hope everyone has a great week!

Saturday, December 24, 2011

The BEST Homemeade Cinnamon Rolls

I got this recipe from allrecipes.com a few years ago and I love it!  These are the most delicious cinnamon rolls and they are really easy to make, especially if you use a bread machine to make the dough.  They are time consuming but not hard and definitely well worth the effort!

The first thing you do is make the dough.  I use my bread machine on the dough cycle for this. 

Next, roll out the dough on a floured surface to a 16" x 21" rectangle.  I have to admit that I never pull out my ruler and measure this.  I just roll until it looks like the right size.  If your dough shrinks back every time you roll it just let it rest for a few minutes and then roll again.

In a bowl, mix 1 cup packed brown sugar and 2 1/2 tbs cinnamon. 

Spread 1/3 cup softened butter over the dough and top with the brown sugar/cinnamon mixture.  Here is another admission.  I usually just spread an entire stick of butter over the dough.  Once you take 1/3 cup there's really not that much left so why not?  These are cinnamon rolls after all so you're already indulging, might as well go big, right?

Next you're going to roll up your dough.  You want to roll it pretty tightly.  At this point I score the roll with my knife so I get even sized rolls and cut it into rolls.  You will want to use a serrated knife for this.  You will get anywhere from 12 to 16 rolls depending on how big you cut them.

Place the rolls into a greased 9 x 13 pan.  I usually make these the night before I plan to serve them so at this point I cover them and put them in the fridge.  If you plan to bake them right away, you need to let them rise for about 30 minutes before baking.  When I make them the night before I pull them out of the oven and let them sit on the counter for about 30 minutes but you can just go straight from fridge to oven (allow for some extra cooking time though).

Here they are after being baked for about 25 minutes. 

And here they are after being topped with the delicious cream cheese frosting.  My crazy little Peanut doesn't like hers with frosting so that is why the one in the corner is plain.  These rolls are crazy good warm from the oven.  They are sweet and buttery and tender and....well everything a good cinnamon roll should be!

Clone of a Cinnabon
via allrecipes.com

Ingredients

  • 1 cup warm milk (110 degrees F/45 degrees C)
  • 2 eggs, room temperature
  • 1/3 cup margarine, melted
  • 4 1/2 cups bread flour
  • 1 teaspoon salt
  • 1/2 cup white sugar
  • 2 1/2 teaspoons bread machine yeast
  •  
  • 1 cup brown sugar, packed
  • 2 1/2 tablespoons ground cinnamon
  • 1/3 cup butter, softened
  •  
  • 1 (3 ounce) package cream cheese, softened
  • 1/4 cup butter, softened
  • 1 1/2 cups confectioners' sugar
  • 1/2 teaspoon vanilla extract
  • 1/8 teaspoon salt

Directions

  1. Place ingredients in the pan of the bread machine in the order recommended by the manufacturer. Select dough cycle; press Start.
  2. After the dough has doubled in size turn it out onto a lightly floured surface, cover and let rest for 10 minutes. In a small bowl, combine brown sugar and cinnamon.
  3. Roll dough into a 16x21 inch rectangle. Spread dough with 1/3 cup butter and sprinkle evenly with sugar/cinnamon mixture. Roll up dough and cut into 12 rolls. Place rolls in a lightly greased 9x13 inch baking pan. Cover and let rise until nearly doubled, about 30 minutes. Meanwhile, preheat oven to 400 degrees F (200 degrees C).
  4. Bake rolls in preheated oven until golden brown, about 15 minutes. While rolls are baking, beat together cream cheese, 1/4 cup butter, confectioners' sugar, vanilla extract and salt. Spread frosting on warm rolls before serving.


Winter Break Bucket List

 Hooray!!  Winter break is FINALLY here!  I swear, having to work a FULL week the week before Christmas felt like pure torture!  It was rough to say the least.  We had a lot of things going on but still the week seemed to drag on forever.

Today is the first official day of our glorious two week vacation and I have lots of things planned to accomplish before heading back on the 9th. 

Here is my "Winter Break Bucket List"

1. Get rid of this sore throat/cough/congestion that's been plaguing me for the last few weeks.

2. Read through all of my cookbooks that I've gotten and not had the chance to read yet. 

Aren't they beautiful?

3.  Have a massive cooking day and stock my freezer using recipes (and others) from these books:

4.  Make this caramel corn.

5.  Catch up on my blogging.

6.  Knit a baby blanket for a friend and possibly start one for myself.

7.  REST, RELAX and HAVE FUN!!

Tuesday, December 20, 2011

Sloppy Joe Pockets


This was a great weeknight meal as it was quick to throw together and the cooking time was short.  You can easily vary the recipe to suit your taste.  It's a great variation on the old sloppy joe sandwich.


Brown your ground beef.  I use the leanest I can find for this because then I don't even have to drain the grease!


After your beef is cooked add in a can (I used a little less than the whole can) of sloppy joe sauce (like Manwich).


Roll out your pizza dough and cut it into 4 pieces.  Top with cheese.  (The recipe calls for mozzarella but I used cheddar jack because it's what I had).  Top with meat and pizza toppings of your choice.


Bake for 20-25 minutes until golden brown and enjoy!


Sloppy Joe Pockets
Inspired by Amy's WFD Blog

1 pound lean ground beef
1 can sloppy joe sauce
1 can (10 ounces) refrigerated pizza dough
1 cup shredded mozzarella cheese, divided
1 cup pizza toppings, such as mushrooms, bell peppers, onion or olives

1. Preheat oven to 375F.  Brown ground beef in large skillet. Drain fat. Add sloppy joe sauce. Set aside to cool.
2. Unroll pizza dough onto greased baking sheet. Cut dough into 4 squares. Sprinkle 1/4 cup cheese onto one-third of square lengthwise. Spoon beef mixture over cheese. (Do not spread to the edge).
3. Top with pizza toppings. Fold side of dough over filling; press around edges of pocket with a fork to seal. Bake 20 to 25 minutes or until crust is golden brown.

Tip: Cooked pockets can be wrapped tightly in foil and frozen. Reheat in preheated 350F oven 20 minutes or until heated through.


Saturday, December 17, 2011

Garlic Chicken Stir-Fry


This recipe comes from Good Bite Weeknight Meals Delicious Made Easy.  It is a cookbook put together by various food bloggers. 

It was a really quick dinner to throw together and you can vary it by using different vegetables.  You could also make it even quicker by using chicken tenderloins.

Garlic Chicken Stir-Fry
By Lori Lange (recipegirl.com)

1/2 cup chicken broth
2 tbs. low sodium soy sauce
1 tbs cornstarch
1/2 tsp ground ginger
3 tbs canola oil, divided
1 lb. boneless, skinless chicken breasts, cut into 1-in. pieces
4 garlic cloves, minced
1 large red bell pepper, stemmed, seeded and chopped
1/2 cup snow peas
1/4 cup unsalted cashews (I omitted these)
1/4 cup sliced scallions
Hot cooked rice

Place the chicken broth, soy sauce, cornstarch and ginger in a small bowl and stir until combined.  Set aside.

Heat 2 tablespoons oil in a large skillet over medium-high heat.  Add the chicken and garlic and stir-fry until the chicken turns white, about 3 minutes.  Add the remaining 1 tablespoon oil, the bell pepper, snow peas, cashews and scallions and stir fry for 1 minute.

Reduce the heat to medium, add the chicken-broth mixture, and bring to a boil, stirring.  Boil until the mixture thickens, about 1 minute.  Serve immediately with the hot cooked rice.

Friday, December 16, 2011

Truffle Hot Chocolate Balls


I found the recipe for these truffle hot chocolate balls on Mel's Kitchen Cafe
I thought the idea was genius!  I made them and I loooove them!  When it comes to hot chocolate, there just is no comparison between homemade (made with milk) and the stuff in the packets you mix with water.

With these, I just make up a batch, roll the balls individually in plastic wrap, put the wrapped balls in a ziplock bag and keep them in the freezer.  Then whenever we feel like having hot chocolate we just heat up 8 oz. of milk and drop in one of these little truffles.  So easy and so incredibly rich and delicious!

Truffle Hot Chocolate Balls

Makes about 9-10 hot chocolate balls

INGREDIENTS:
12 ounces semisweet chocolate chips (about 2 cups)
1 cup heavy cream
1 tablespoon sugar (optional)
1/8 teaspoon salt

DIRECTIONS:
In a medium bowl, combine all of the ingredients. Microwave for one minute intervals, stirring often, until the mixture is combined and very smooth and silky. When you first start stirring, after the first minute or so, you’ll wonder if this mixture will ever come together. It will look grainy and messy but after it heats thoroughly and is whisked to combine, it will magically become beautifully smooth. Be careful not to overheat as the chocolate can seize. The trick is to stir often since the mixture will blend together even when it looks like the chocolate chips haven’t melted completely.

Let the mixture cool for about 10 minutes at room temperature. Cover the bowl with plastic wrap and place in the refrigerator until the ganache mixture is firm and scoopable, about 2-3 hours. Scoop out about 1/4-cup spoonfuls of the mixture and place them on a wax paper-lined baking sheet. My cookie scoop is about 1 1/2 tablespoons. I mounded two of the heaping cookie scoops full of ganache on top of each other to form one ball. Place the baking sheet in the refrigerator and let the mounds harden slightly, about 15-20 minutes. Roll the chilled mounds into balls and place on squares of plastic wrap (about 4 inches by 4 inches). Pull the sides of the plastic wrap over to cover the ball and place the balls in the freezer until ready to use.

To make the hot chocolate: pour 1 to 1 1/4 cups (depending on how rich you like your cocoa) milk into a microwave-safe mug. Microwave for about 2-2 1/2 minutes.  Carefully drop one unwrapped truffle hot chocolate ball into the milk. Stir well until the chocolate is combined with the milk. Serve warm!

Cookie Balls

I went to a cookie exchange last weekend and brought three different kinds of cookie balls.  They were not hard to make at all, but they were definitely time consuming and tedious.  Especially when you have to make 6 dozen of them! 

The three varieties I made were vanilla caramel, chocolate mint and gingersnap.  I forgot to take pictures, which is a shame because the peppermint ones came out really pretty.  These pictures came from the web. 


Vanilla Caramel Cookie Balls

70 vanilla wafers, crushed
8 oz. cream cheese, softened
1 pkg. melting chocolate (I like the Wilton candy melts but you can also use chocolate chips)
Sprinkles

Mix the crushed cookies and cream cheese in a large bowl.  Roll into 1-in. balls and place on a cookie sheet.  Freeze for 10 minutes.  Dip in melted chocolate and top with sprinkles.  Refrigerate or freeze until firm.

Chocolate Mint Cookie Balls

1 pkg. mint Oreos, crushed
6 oz. (3/4 pkg) cream cheese, softened
white chocolate, melted (I like Wilton candy melts, but you can also use white chocolate chips)
Crushed candy canes

Mix crushed oreos and cream cheese in a large bowl.  Roll into 1-in. balls and place on a cookie sheet.  Freeze for 10 minutes.  Dip in melted white chocolate and top with crushed candy canes.  Refrigerate or freeze until firm.

Gingersnap Cookie Balls

1 lb. gingersnap cookies, crushed
8 oz. cream cheese, softened
powdered sugar

Mix crushed cookies and cream cheese in a large bowl.  Roll into 1-in. balls and place on a cookie sheet.  Freeze for 10 minutes.  Roll in powdered sugar.

Butter Cookies

For as long as I can remember, it has been a family tradition to make these cookies every year at Christmas time.  When we were kids my mom made what seemed like hundreds of them and filled tins with them and gave them to all our teachers as gifts.  I honestly can't think of a year that these cookies didn't make an appearance.  As I got older and moved out I always continued to make them.  Because it just isn't Christmas without these cookies!


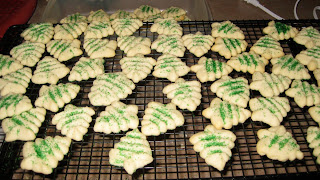
Some people call these Spritz Cookies.  We've always just called them Butter Cookies.  They are so light and delicate and so delicious!  You can really decorate them any way you want.  Some people add food coloring to the dough.  Eating green cookies seems weird to me so I choose to just leave them white and top with colored sugar and red hots. 


You will need a cookie press to make these.  There are lots of different kinds out there but my favorite is this one by Wilton.  It does take a little bit of practice and patience, but once you get the hang of it you'll have tons of cute little cookies in no time!


These cookies freeze perfectly which means you can start baking in advance.  Just wrap them carefully because they break easily.

Butter Cookies

2 sticks butter, softened
1 egg
2 1/3 cup flour
1/2 cup sugar
1 tsp almond extract

Cream butter.  Gradually add sugar and beat until light and fluffy.  Beat in egg and almond extract.  Gradually blend in flour.  Fill cookie press with dough.  Form desired shapes on ungreased cookie sheets.  Bake at 350 for 8-10 minutes.

Yield: about 7 dozen

Bad Blogger!

Sorry I have been such a bad blogger lately!  In the last few weeks there's just been so much going on!  Thanksgiving, then we had strep go through our house for two weeks straight!  And now it's Christmas time!

My school district goes until the 23rd which means no time to get ready for Christmas!  It's crazy!  But as my mother in law pointed out (she's so wise), I'll probably enjoy Christmas even more knowing that I have a two week vacation ahead of me!  Oh yes I will!

I have been doing a ton of baking over the last couple weeks.  I love to give my friends and family homemade goodies as gifts at Christmastime.  And I love to bake them all!  So I decided to get a jump on my baking and stash it away in the freezer.  So far I have made butter cookies, gingerbread cookies, fudge and chocolate peppermint kiss thumbprints.  I'm planning to finish up my baking for gift giving this weekend.

So although this is a busy, hectic time of year, it's been a fun (except for the strep) few weeks and I am looking forward to getting back to posting some new recipes soon!